Show Maps
Objective
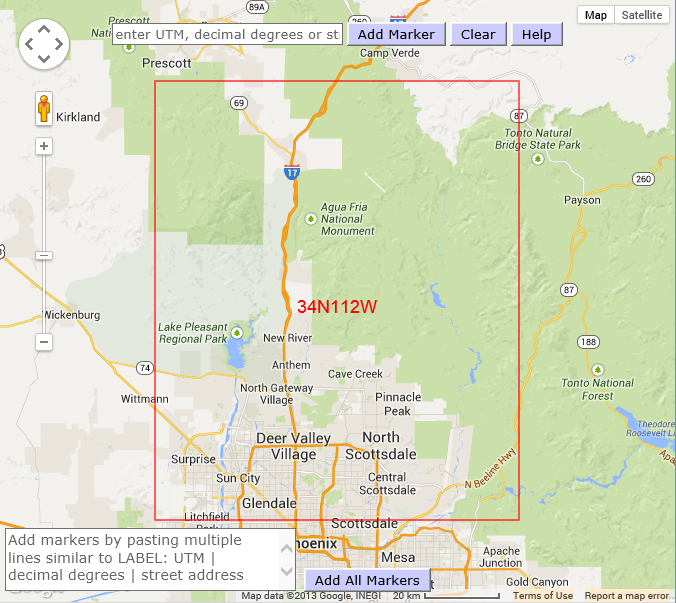
The Show Maps sub-function displays a map highlighting the area where the site is located. DigitalRockArt areas encompass 1 degree of latitude and longitude. In Arizona, an area is about 4,000 square miles.
Processing
The Show Maps sub-function provides access to Google Maps by clicking on the area (example: 34N112W) in any Select a Survey list or caption.
The starting view is a map. A satellite view is accessed by clicking on the button located in the top right corner of the map. Under the Satellite option is a "Labels" checkbox option that will overlay the view with roads and placenames. Under the Map function is a terrain option that will show the terrain. The upper left corner has zooming and panning controls. The lower right corner shows the map scale.
In addition to using the zooming and panning controls in the upper left corner, the map viewpoint may be changed by:- a mouse double-click zooms in one step and centers the map at the clicked point
- a mouse left-click, drag and release
- the mouse scroll wheel zooms in and out
 |
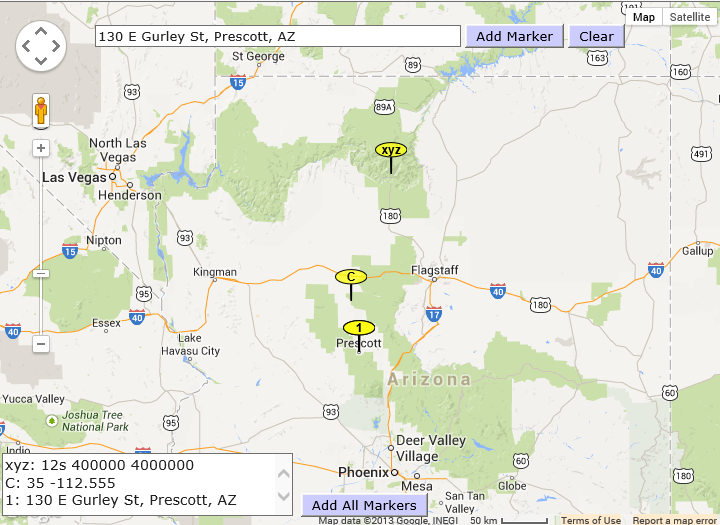
Near the top of the map is a text entry field and a Add Marker button that provides access to custom marker functions and the Google geocoder function. The custom marker function will intercept:
a NAD83/WGS84 UTM in the format 12s 400000 4000000 -- the zone letter must be included!
a decimal degree in the format 34.0000000 -112.000000 -- western hemisphere longitudes must be negative numbers!
If the custom marker function recognizes either a UTM or decimal degree notation, a marker will be added to the map and the map will be centered at the new marker. Holding the mouse over the marker will display a tooltip with the location appended with either "utm" or "degrees".
Any value not recognized as a valid UTM or decimal degree is passed to the Google Geocoder for resolution. Successful resolution of an address will center the map at the given location and may zoom the map in or out. Holding the mouse pointer over a marker created by the geocoder will display a tooltip with the formatted address returned by the geocoder.Examples of valid entries that may be passed to the geocoder include:
- Prescott, AZ
- 130 w gurley prescott az
- +35° 10' 11.56", -112° 56' 18.27"
By default, the marker flags will be numbered sequentially starting with 1. As an option, the marker label may be specified by prefixing with a label followed by a ":". For example "Pre: Prescott, AZ".
A clear button near the top right center will clear all the overlay markers from the map.
 |
On the lower left of the map is a textarea overlay that will log all markers added to the map. The clear button will not clear the log. The textarea may be edited or pasted (one address per line) and all entries may be added as markers by clicking the adjacent "Add All Addresses" button. The first field on each line must be a marker label followed by a colon.
Right-Click to Mark UTM
To obtain the UTM of a location on the map, position the mouse pointer on the location and right-click. The UTM will be added to the text field at the top of the map followed by a simulated click of the Add Marker button.
Printing Maps
A typical problem with printing maps is that the printed version will not include the entire map shown on the display, but a portion beginning at the top left corner. The only solution is to use the print preview and browser print formatting controls.
Buttons
Add Marker: adds a marker for the given location and logs the address in the textarea.
Clear: clears all markers and the rectangular highlight from the map.
Help: opens the wiki help page in a new tab or window.
Add All Markers: adds a marker for each address line in the textarea.