Introduction to DigitalRockArt, Part 2
Contents
This is part 2 of IntroductionToDigitalRockArt. If this is your first visit to this web site, you may wish to read that page first.
A typical day's recording by a team of two people recording rock art in the field will produce about 4 pages of forms and 400 digital images. Because no photo (image) log is kept and the image sequence is based primarily upon lighting conditions rather than panel sequence, the first step is to sort the images.
Sorting and Selecting Images
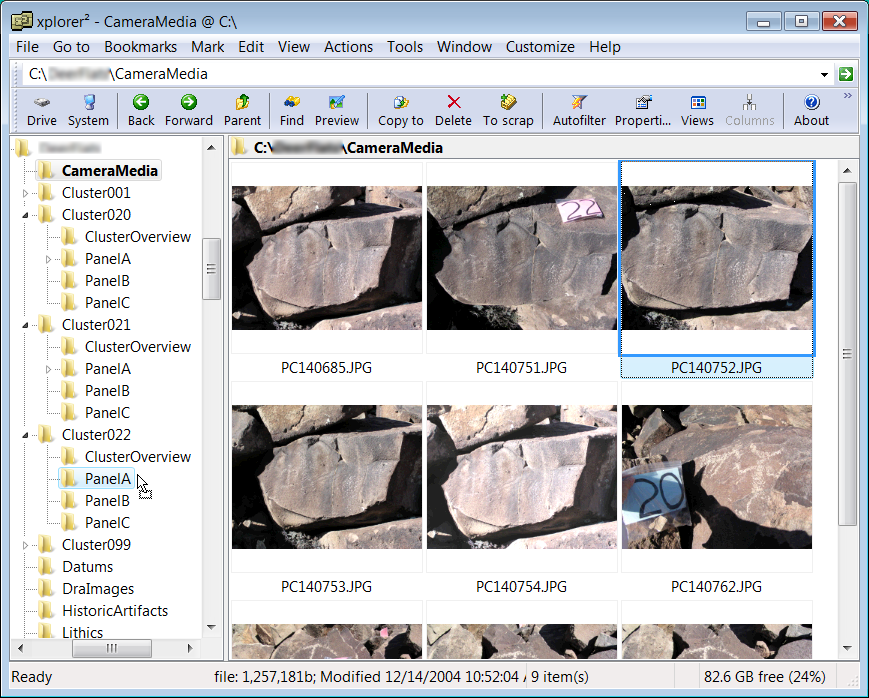
Using the rock art recording forms and a computer, the digital images are sorted by cluster and panel. In the example below, a folder structure has been created for the newly recorded site. All digital images have been uploaded from the camera to the CameraMedia folder. One by one, the images are cut and pasted (or dragged) from the CameraMedia folder to the proper panel, cluster, SiteOverview, etc. folder. In the example below, image PC140752.jpg is being moved from the CameraMedia folder to the PanelA folder under the Cluster022 folder.
After sorting, the best image or images for each panel will be selected and renamed to include the cluster number and panel letters (e.g. Panel022A.jpg). The selected images will be moved to a separate folder (DRAImages in the example below) and then written to a DVD.
 |
Computer Recording
A transmittal form is completed and the DVD with the images is sent to the DigitalRockArt web-site administrator. The administrator will verify that a recording permit has been issued to the recorder and the land manager or owner concurs with adding the survey to the database. For small sites with only a few images, the administrator may create an empty survey and the digital images may be uploaded directly to the server by the recorder.
The remainder of the computer recording is completed via the Internet. The Firefox browser is recommended, but any current browser such as Internet Explorer, Safari, Opera, Navigator, Chrome, or Konqueror may be used. For recording work, the minimum recommended monitor resolution is 1280x1024.
Within the DigitalRockArt application, the digital images of rock art panels are considered to be the most important data. Digital images are a prerequisite for entering ground survey data. The ground survey data is optional. Should there be insufficient field time available to do a detailed recording of a site, a fast high level survey can be performed by taking a few digital images and adding them to the database. While the absence of the data normally collected on the rock art recording form will prevent the creation of topo charts, the DigitalRockArt system collects the bulk of the recorded data directly from the digital images.
For the first three steps of computer recording, the images are sorted into a series of queues that are processed sequentially. The first step, Categorize Images, creates a queue of images of rock art panels for the second step. The second step, Identify Elements, creates a queue of elements to be processed in the third step, Define Element Attributes. The most import recording functions are described below.
Categorize Images
In the first step of computer recording, each image is assigned to a category. If the image category is rock art, the cluster and panel numbers are entered based on the new filename created in the Sorting and Selecting Images step described above. The relative scale of the image is recorded from data on the rock art recording forms. In the example below, the vertical length of the element was recorded as 0.51 meters. The measured points on the image are recorded by clicking on the image. These are shown as green + symbols.
Additional data about each panel is collected by viewing the panel images and clicking check boxes that describe the panel attributes. The ground survey data from the rock art recording form is entered by keying the data into the respective boxes. The next few images in the queue are shown at the bottom.
Identify Elements
In the second step, each element is identified and "cropped" from an image. In the example below, the Geometric Rock Art Class radio button was clicked, and then the upper left and lower right corners of the green bordered box were clicked to indicate the cropped area. Next a pecked point on the element was clicked to create the element number 1 and a point on the natural patina was clicked to create the letter N (Natural). Should the panel have multiple elements, the process would be repeated for each element.
The original image is not modified nor copied to create a "cropped" element. This process only captures XY coordinates that may be fine-tuned later.
Define Element Attributes
In the third step, each element identified in the previous step is reviewed and described in detail. Here the cropped area may be adjusted and element comments may be added.
Attributes are assigned to the element by viewing the cropped element image and clicking the appropriate check boxes. The General attributes shown below are the same for all elements.
Class-specific attributes are unique to each element class. For example, the attributes used to describe geometric elements are different than those used to describe zoomorphic elements.
Customize Topo Charts
Topo charts are automatically created from the ground survey data. In many cases the recorder will want to customize the topo charts to make them more readable or to split large sites into multiple charts. In the example below, two outlying clusters force the default chart into a 5-meter grid and make the cluster numbers in the site center difficult to read.
 |
One solution is to shrink the bearing lines for clusters 14 and 28 to 6 meters.
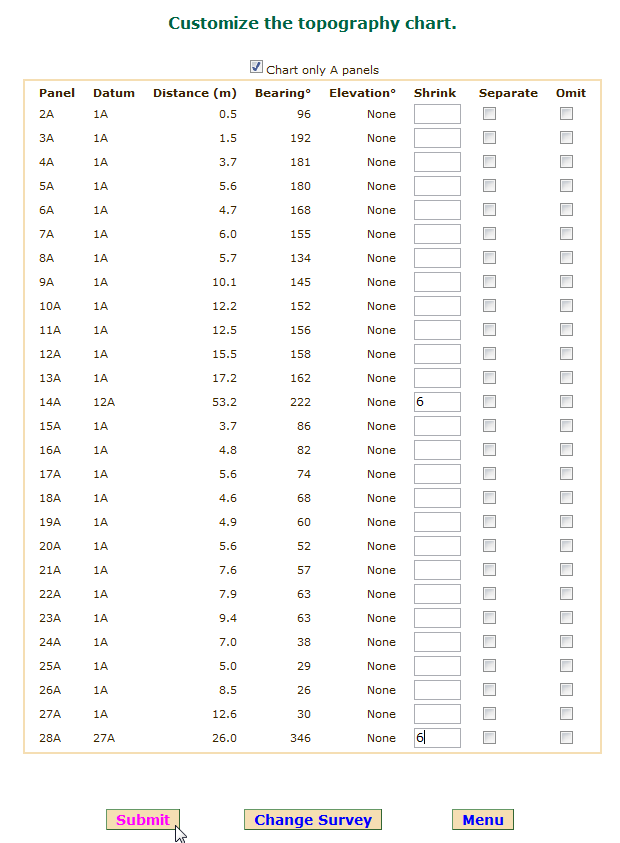 |
The application redraws the topo chart with the bearing lines reduced to 6 meters. The actual distance is shown in a small box overlaying the bearing line. Note the EW-NS measurements in the upper left corner are unchanged from the previous chart.
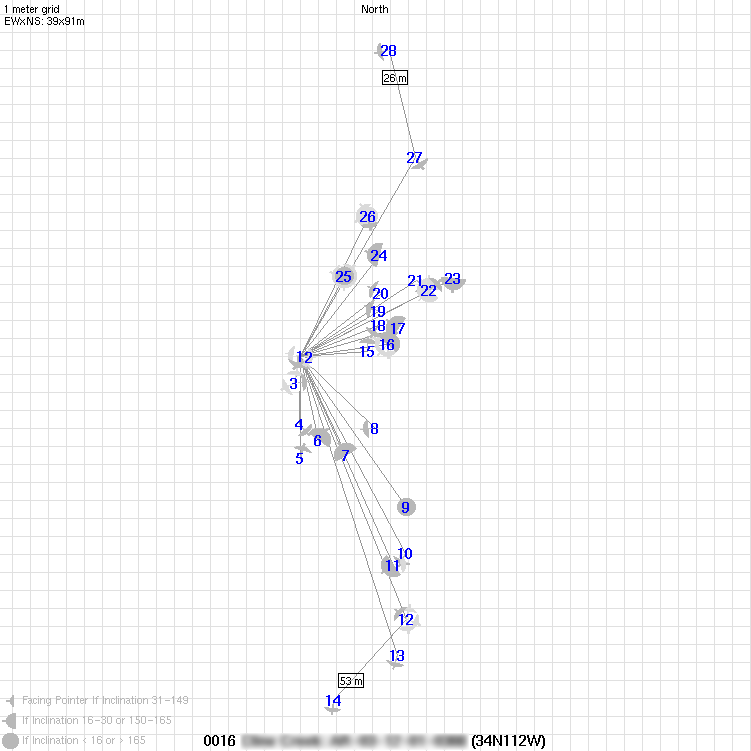 |
The legend in the lower left of the chart above defines the panel facing and inclination indicators. Cluster 12 has four panels with the dominant A panel facing northwest. Cluster numbers on topo charts are hyperlinks that will open a new window with the Cluster Information sub-function. The above is a partial screenshot so there are no active hyperlinks: see a
![]() working example here.
working example here.
Annotate Images
If overview images of the site were taken, notations may be overlaid on the images to show the location of clusters or panels. Data is entered into the form on the right and then the image is clicked to position the data on the image. Here the position of cluster number 122 is about to be marked by clicking on the image just below #121. Each cluster number will be made into a hyperlink -- additional images and data may be viewed by clicking on the image near a cluster number.
The data was collected in the field by photographing the scene with numbered markers on each cluster. The image below was taken after the markers were removed or hidden. The accuracy of the field measurements may be checked by comparing the topo charts with the site overview images.
The original image is never modified. The font size and color may be changed and entries may be deleted.
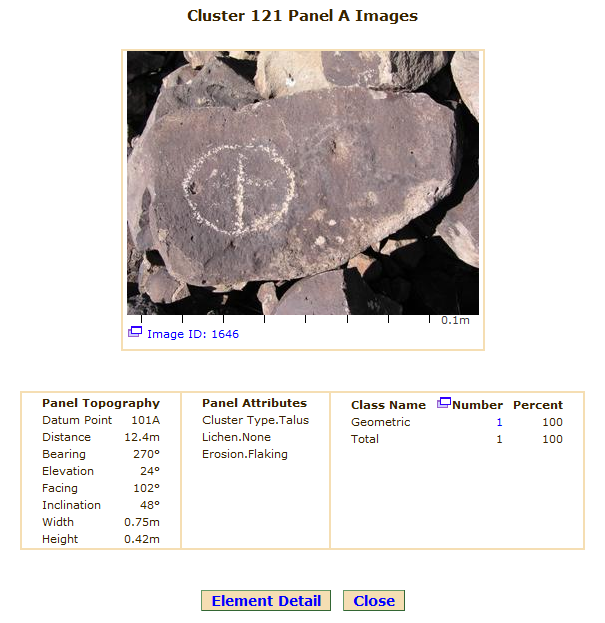
The direction of the camera lens may be determined by clicking on a cluster number that has a panel facing toward the camera. The example below shows the result of clicking on cluster #121. By adding 180 degrees to the panel facing of 102, it can be determined that the camera lens was facing west when the site overview image was taken.
 |
Survey Report
A narrative describing the survey findings and including images and graphs from the database may be written using the companion MoinMoin wiki (you are reading a wiki page now). Here is a snippet of a survey report showing an image extracted from the rock art database.
One of the advantages of standardized reporting is that there are averages available for comparison. Changes to the rock art database are immediately reflected in the web version of the report. Here is another snippet from a survey report showing a table and graph of data extracted from the rock art database. If you are a visitor who has not logged in, the entire report may be viewed by clicking on the "RAI Example" hyperlink located in the left panel under "Tutorial".
Documentation
The wiki pages containing the user manual may be read without logging in. Each function has a corresponding wiki page with example screenshots. If you are a visitor who has not logged in, the Tutorial menu on the left has links to more detailed documentation for each function (you are reading the Introduction Part 2).
The biggest challenge to analyzing rock art across sites is the creation of a standardized method of classifying and describing elements. Links to the current attempt at element classifications are described on the left under Attributes. Element classes and attributes are application data and may be changed from time to time.
Security Considerations
Access to the database requires a login ID and password. The database does not contain any precise location information. Because site names and site numbers frequently contain clues to a site's location, only those users authorized by the land manager or owner may view them. Logged in users have full access to all detailed survey data and images.
A Status Report for a recorder authorized to update one site will be similar to that shown below. The database contains only general area information for each recorded site. The site's area is the latitude and longitude rounded to whole degrees. Clicking on an area hyperlink, such as this one
![]() 34N109W
will open a new window with a Google map. The site of interest is located within the 4,000 square mile area indicated on the map.
34N109W
will open a new window with a Google map. The site of interest is located within the 4,000 square mile area indicated on the map.
The precise location of each site is shared between the recording team and the land manager or owner.
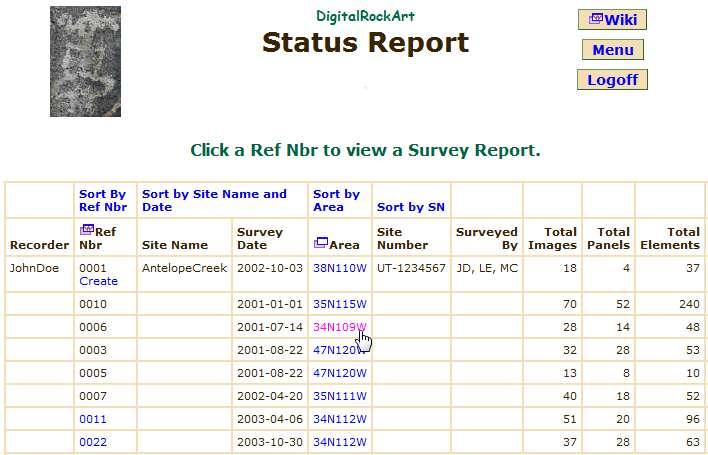 |
More Information
The DigitalRockArt application is under active development. Access to the application and database is limited to individuals willing to assist by contributing ideas or testing the application. Recording a rock art site will require a permit from the land manager or owner.
If interested, please contact digitalrockart@yahoo.com.
 DigitalRockArt Wiki